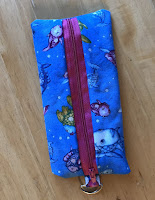
For this project I just used a couple random scrap pieces I had and one of the zippers I already owned. I got a bunch of zippers of amazon and was pleased with all the color choices and overall quality. Although, there was no black or brown. I use bright colors more than plain colors in all of my projects.
Here are a couple images of this pouch I made in the past:
For the fish one I had added a D-Ring but did not for this tutorial. I will tell you the step when you can add a D-Ring if wanted. I can also make another pouch tutorial to show where to add the D-Ring if anyone wants.
Materials Needed:
- 2 pieces of fabric that are about 7inches x 7.25 inches. One will be for the inside.
- 1 zipper that is at least 7 inches long. I prefer to use a 9 inch and cut off the excess.
- Basic sewing supplies (Machine, thread, scissors, ruler, etc)

Time: Takes under 30 minutes.
You start this project by cutting out your materials. I want to note that I personally don't usually prewash fabric OR iron it before a project but I know a lot of people do.
Once you have your materials ready this project is pretty easy.
You want to set your zipper on your lining fabric on the longer side. I always put the zipper pull on the right side although I am not sure if this actually matters or not. I made the mistake with this project that the print was supposed to be on the outside with the plain color on the inside but it ended up being backwards. My bad.
Next you put the outer fabric on the top side of the zipper with the right sides together (the part you want people to see)
Now you are going to sew that together. I know most people use a zipper foot, I don't. But like I have stated in my About Me page, I am not super anal about the little details like that and all of my projects are just for fun/family members.
Once that is sewn together you can open it like so:
When you sew it together it will look like this:
Now it is time to turn it right side out.
Make sure you open the zipper!!!!!!
If you don't open the zipper than you won't be able to turn your project the right way once you sew the final spot.
You should now turn the project inside-out.
You will now be sewing the ends together. Make sure that the zipper is lined up with the middle of the fabric on the opposite side as you can see I did in the pictures. Before you sew the ends, make sure the zipper is open!
I am not sure how well you can tell by the pictures but you just sew across each end to close them off. Then you trim off the excess zipper/fabric. I know some people use a fancy stitch on each end to make it look nicer, I don't. If you are adding a D-ring, this is the step that you would add that on. If you need help figuring out how to do that, add a comment and I will gladly make a tutorial for it.
Now that the excess material is cut off, you can turn the pouch right-side out again and you are finished!
Again, I made the error of accidentally switching the spots of the lining fabric and outer fabric. That doesn't bug me but it might bug you if you wanted it to look a certain way.
The final pouch measures about 6.5 inches x 3.5 inches.I hope you enjoyed my tutorial. This is a pattern I got from a family friend.


No comments:
Post a Comment